tutorial etiketine sahip kayıtlar gösteriliyor. Tüm kayıtları göster

16 Temmuz 2013 Salı

No Heat Beach Waves

There are loads of diferent types of these no heat tutorials for this beachy hair look, and the reason to that is that most people (including me) just love that messy hair. And if you don't, just remember - embrace it! It's an all time (or maybe I should've said immortal) hairstyle that goes with everything! It's playful and can give that 'wow' effect on your whole look. So, I had to do some serious searching to find the perfect tutorial that can do the trick - and i found it! It's an easy breezy tutorial posted by the amazing Aimee Song from Song of Style. All the credit goes to her and her amazing trick!

1. Part your slightly damp hair into two sections (right and left) and start twisting from the root to all the way to the end of your hair. Make sure you twist well!

2. Using a bobby pin, pin the end of your twisted hair to the crown of your head.

3. Twist the other side of your hair in the same direction (I normally twist outwards) and pin to the crown of your head like the first side.

4. Let your hair dry naturally overnight and in the morning, unpin the ends. Shake your head and pretend your in a shampoo commercial, and voila! You got waves! If you'd like to hold the waves, top off the look with a lightweight hairspray such as the Vida Sassoon Pro Series Flexible Hold Hairspray.


27 Mart 2013 Çarşamba

Textured Knot

Hey everyone! Long time no see! I can't wait to show you this new look, which has first appeared at the Band Of Outsiders fall 2013 show. This artfully rumpled style has been created by Duffy, a beauty expert. I've found this tutorial ( well, more like, a video) on Vogue.com on its top 10 stories from this week. I must say that this fashion season will be mostly marked by a little more classier and sleeaker hairstyles, but nevermind, because this is a great mixture of messy and classy! And even though this is a very casual style, it's the texture of the hair that makes it so exceptional!

For more info about the products used in this video (oh yeah, don't be afraid of clicking the link, It's not a virus or a pop-up, It will just open an extra tab and you will watch it there!) you can visit the Vogue page here. And as for the video, just follow this link: http://bcove.me/5i06rgeb


14 Ocak 2013 Pazartesi

Big Classic Bouffant

I really am a fan of this look, and I always was. It's so classic, feminine and the dramatic cat eye eyeliner is probably my absolute favorite look, although I don't wear it. Anyway, I found this handy tutorial on Bobby Glam Blog, and If you want to check it out you will find lots of these classic hair tutorials. 


Firstly, you need to fit the Hair Booty hair extension to help achieve a big bouffant to rival Brigitte Bardot’s! You need to take a section from the front of your hair to pull back over the Hair Booty once it has been fitted. Like you can see in the pics above, if you have a fringe like me, take the section from behind your fringe. If not, begin so you are in line with your temple. Take a section about 2cm wide to cover the Booty.
Take the sectioned hair and secure with a sectioning clip to keep it out of the way whilst you are fitting your Hair Booty.
Now you need to fit your Hair Booty, the trick here is to put the Booty quite high up on your head as it creates a much bigger and more voluminous bouffant. So the clips of the Booty will be fitted on to the top of your head, with some falling around your crown area. Now, if you’re wanting a super duper bouffant you could always backcomb your hair before you fit the Booty. If you don’t want oodles of volume, you can skip this step … totally up to you.

Once you have your Booty fitted you then need to un-clip the section that you sectioned off in step 1. This will be pulled over to cover the Hair Booty. Backcomb this section a little and spritz with hairspray to ensure all of it is covered.
Pull all of your hair over to one side and secure in place with bobby pins. The side you choose is completely up to you; generally the same side as your fringe works best.

Then if you have a fringe, you need to pull this over and secure neatly with a bobby pin. If you don’t have a fringe you can just pull a section of hair to the side and secure it with a bobby pin too … it should still look the same.
Next you need to take your hair straighteners or curling tongs, whichever you prefer, and carefully add a few curls throughout the ends of your hair. Be sure to start the curl from the mid-lengths of your hair to achieve that classical look!

7 Ocak 2013 Pazartesi

Holiday Hairstyle Inspiration

Hey! I haven't posted anything a long time ago... sorry about that. But I'm very happy today, because here, it's Christmas! I've spent this day wathching some Christmas movies like 'Home Alone' with my family and of course, eating! And I am so excited, so It seemed nice to post sometnig finaly. So, these are my top three festive, kinda, holiday inspired hairstyles, and I have a tutorial for each one of them! I hope you'll enjoy it! And Merry Christmas to everyone who is celebrating it today just like me!!!


No1: Loosley Curled Chignon
This is a tutorial I found on She Lets Her Hair Down, (actually I found all of these tutorials there) and I really like that blog! It's so inspirational, and you can really find any hair tutorial! I love it, thank you! 

Prep your hair by spraying hair spray all over it and brushing it through twice to have a texture that can easily be molded. You need that "dirty" texture in order for your hair to hold a curl and to achieve a hairstyle like this. 

Separate a section of hair at the top of your head and clip it out of the way.
Curl all of the rest of your hair in whichever direction you'd like. This doesn't need to have a rhyme or reason to it because it is just to give your hair texture. Once it is all curled, separate the curled hair into two equal sections and twist them until you reach your ends. 

Keep twisting them together and overlap the two sections over and over to create a loose bun at the back of your head. Pin the bun in place using strong bobby pins. Don't make it too tight on the sides. Take down the section of hair at the top of your head and curl it all going back and away from your face. Loosely separate the curls with your fingers.

Bring the curled hair at the top of your head back towards your bun and twist the ends so you can pin it into place. Loosely pin the top section towards the back using hair pins. The look should be loose and have a little bit more volume at the top than on the sides. 


No2: Mini Crown Braid
As always, it's best to have slightly dirty hair so your braids stay in place and so you can easily attach pins into your hair. Here are some products you can use to give your hair that "dirty hair" texture.


 Start with a small triangle section on one side of your middle part. Split that small section into three smaller sections. Start a normal three strand braid by taking the section that is closest to your middle part and bringing it under the middle section making it now the middle section. Now take the section closest to your forehead and bring it under the middle section.

You're now going to add hair to your three strand braid by taking a long section from your middle part to where your braid is laying. Add that hair into the section that is closest to your middle part.

Now take that whole section under the middle one making it the new middle. Next, take the section closest to your forehead and bring it under the middle section (you're not adding hair on this side). Now you will repeat steps 4 and 5 until you reach the end of your middle part (about 3 times).


After reaching the end of your middle part, you will continue braiding like normal without adding hair.
Once you absolutely can't braid that hair anymore, you can tie it off with a small elastic band or with a bobby pin.Repeat the same braid on the other side and secure it at the end.

Wrap each braid around your head and pin the ends into the braid on the other side. Hide your pins and the ends of your hair by tucking them under the other braid. It might help to add some hairspray to the spot where you will pin the ends into to make sure the pins and braid stay in place.


No3: Stars Chignon
I already posted a very similar tutrorial, you can look up the tutrorial here. But If you would like if you want to look up the whole tutorial go to She Lets Her Hair Down. Here's a quick gif to show you how to warp the chignon, and for the rest well, I already posted the link. 
Don't forgent to get the "dirty" texture, it's essential. You will need strong bobbi pins, hairspray and an  festive accessorie (optional).  


The star bobbi pins are as I said, optional. Here is the original DIY tutorial for the star bobbi pins that she used here, or you can buy also similar bobbi pins on Ebay

Good luck!

24 Eylül 2012 Pazartesi

Slicked Back Hair

Well if you ever wondered how to make this very slicked hairstyle here's a tutorial from Love Aesthetics. The blogger, Ivania Caprio, has that unusuall style that shines on her personality. That's why I love her blog, it's so beautiful, and represents the minimalicstic lifestyle. And so is this hairstyle. I only saw it on runways last year (but they're coming back this year too! Only in sleak ponytails, buns and more...). Learn how to make it:


6 Eylül 2012 Perşembe

Hair Extensions for Beginners

Well yes hair extensions! They can be very helpful when it comes to styling. It's actually very obvious why they're so important. The hair it's self is human, and of the best quality, so it's also very important to find a great quality hair extention clips. Why clips? Well they're the easiest to insert. I recommend HeadKandy extensions because the set comes with a lot of hair. Which is great if you want a real natural look.
I've learned all that in the Hair Extention for Beginners post from the amazing blog named WhishWhishWhish.

The colour is the least of the problem. You can always email the team and they would recommend you the colour that might fit you the best. So no worries about that. Insering them is very simple too, and even if you don't really get it this time, you can always check some videos. After some practice, if your hair colour is not completely matching the hair extensions colour, learn how to blend it all out! 


To put them in, you simply part your hair, clip up a section, backcomb at the roots slightly so the clips have something to grip, and clip away! There is a guide that comes with your extensions that tells you exactly where to put which section of hair, and each section is also numbered in the order you insert them too.

It all just takes a little practice. Do you use hair extensions?

31 Ağustos 2012 Cuma

Summer Nights/Floral Hair Tutorial

This tutorial is very girly and femmene, perfect way to combine braids and flowers. To be presice, the cute small wildflowers. It's simple, using the overlapping technique, and the basic braid, you can get this look in no time! Thanks again to Sincerely, Kinsey for sharing this amazing tutorial.


Preparation: You can curl your hair a day before, just so it will be easy to work with it. You'll need bobby pins and wildflowers (real or faux). Ok, start with your hair down. Begin with a small strand from each side of your head, close to your ear, warp it around to the opposite side and pin it (like in this tutorial). Repeat the process ntill you get the look from the fourth picture. After that, create a semi-loose braid with the best of your hair. Lastly, add flowers throughout your braid! 

Have a nice day friends! 

30 Ağustos 2012 Perşembe

Perfect Top Knot

There's nothing more atractive than a beautiful messy top knot. If you're running late on a date, or something, there's an easy technique to achieve. It's most known as the french twist. Or a knot, I'm not sure.Take a try on this amazing hair tutorial from A Cup Of Jo, that will blow you away. Would you ever wear your hair into a knot?


"1-2. Start putting your hair into a high ponytail, but don't pull the hair all the way through the rubber band. You want to end up with a little loop on top with some hair left over at the bottom. (By the way, I love doing a top knot on hair that isn't combed through, so I use my fingers to get my hair into place; that way, keeps some of the imperfect lumps and bumps. If you prefer a more polished look, you can comb your hair into a sleeker ponytail.) Tip: If your hair isn't quite long enough to get a top knot, you can also wear the knot lower down on your head.

3. Take the section of hair that's free from the rubber band and twist it.

4. Take the twist and wrap it around the base of the little loop of hair you created. If you have long hair, you may need to wrap it more than once. If you are wrapping it a few times, do it loosely…you don't want it too tight and rigid.

5-6. Use bobby pins to pin the bun in place. I like to secure my bun with four pins: one in the front, one in the back and one on either side. You may have to use more if you have thicker hair. I've also found that "U" shaped pins work better to hold thicker hair. These specific pins are great because they have a rubberized texture that helps grip hair." 


22 Ağustos 2012 Çarşamba

Double Braid

This is not a two braids into one hair tutorial, well actually it will just look like that. But, it's not hard at all, trust me. During the summertime it's nice to take out your ripped up denim shorts and a cute top with a tomboy denim shirt. And try this cute hairstyle! I've found this tutorial on Sincerely, Kinsey and I'm really starrting to love that blog. This beautiful hair tutorial is quick and it looks great with everything.


Preparation: a small rubber band hair tie, a few bobby pins.

Begin with your hair down. Take a section of yor hair from the thicker side of your hair, and braid all the way down. It will lie flat on your head best if you angle it back as you're braiding it. Next, slightly tug all along the braid, to make it look thicker. One the braid is done, pin it on the back far side of your head underneath the top layers of your hair, covering the bobby pin. After that braid the rest your hair into a side braid. Do the same thing like with the frirst braid, tug it all the way down. If the wind isin't cooperating, take a few spritz of hairspray to keep it in place.

Happy Wednesday friedns! 


12 Ağustos 2012 Pazar

Nail Tutorial/Pink Crush

It's been a long time since I've posted a nail tutorial. Maybe because I got a little uninspired. Nail art never was a thing Im good at. But, I'm satified with just watching or adding glitter. My dear friend - Sanya, is very good at that, and she is always creative. So, all of you shoud visit her blog - When I'm Bored. I just love the name.

But, this is not about that. This tutorial is from one of my favorite blogs - The Wonder Forest. It's very simple, plus I get to add sprinkles. Hahahha. It's pretty easy adding them with a makeup sponge. They are a little bit stick so the glitter won't fall off. The white base is important to. So instead of adding multiple coats and messing everything up, you'll have the real bright color with only one coat. And just in case your nails have already dried, put a finishing colorless polish.

nail polish: FOREVER 21 "PEACH"
glitter: FOREVER 21 "CRYSTAL PINK"

2 Mart 2008 Pazar

Twist Tutorial

Let's start by saying hi to our sweet little model. Hi Lana! Today is her birthday and she was so sweet to let me take pictures of her getting her hair done on her big day!


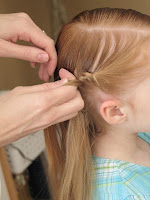
Let's begin, shall we? The twist here isn't so much about twisting the hair as it is about sectioning, pulling pieces and twisting your hands.

Start by wetting the hair. Try to dampen only the front and crown and sides and leave the ends dry. Comb out the hair as smooth as you can. Combing it out smooth is VERY important in this style.

Part out a vertical chunk from the part to the ear.


Divide your section in half. Take a second to look at Lana's mommy's hands. She has the most beautiful hands. Don't you agree?

Pull the bottom half over the top half. You then take a section of hair from the underside of the hair and pull it up into the original bottom half (the next picture demonstrates this better). You usually end up with a section of hair between your thumb and forefinger and another section of hair between your forefinger and middle finger with the palm of your hand next parallel to the hair.

You always bring up hair from the bottom. Never the top. This is where the smooth, damp hair is necessary. It makes it easier to section. Thank goodness for spell check. I can never spell necessary. Twisting the new formed section, you repeat with the original top half.


See Hilary's gorgeous hands, you can see how she is holding the hair. In this style you are constantly turning your hands


Keep going.


Till you get to the end. Twist down a bit so that you don't lose the twist you just made when you secure their hair.


Take a rubber band and secure the end. It doesn't have to be anything fancy, you are just going to take this part out. If your child is older and has the patience, you can have them just hold the twist. That is what I make my Princess do, but she has almost four years on these young pups.


Repeat on the opposite side.


Pull together. Hilary pulls one side over the other. It helps with the stability of the twists. Putting them together is kind of like plates on the earth. They slip and slide and make a big old mess. Trust me and avoid the mess. Put one side on top of the other. Secure them with an elastic.


The hard part is over. Usually her hair is pulled all the way through in a ponytail, but it's her birthday and Hilary is feeling adventerous (hey, we are stay-at-home-moms, most days this is as big as we get in the creativity department) and she decided to pull the ponytail only half through.


This is why I love my friend Hilary. She always teaches me something new. Before I met her, my the ends of my daughters ribbons were all askew. She taught me that if you take your curling iron and curl the ends, it makes them look finished.
So curl your ribbon ends. I promise, it makes the world a prettier place, and isn't that the point of this blog, to make the world a prettier place?

Then curl the ends of the ponytail.


And VOILA'! You have a beautiful princess twist for a beautiful princess on the day she turns 4!

Thanks sweetie! And thanks Hilary for being my partner in crime!