7 Ağustos 2012 Salı

Tween bun for lazy days

Hi.  Remember me?  It's been a while.  Almost three years to be exact.  Life has been fun.  We built a house, moved, had girls grow, figured out how to live with a child who has severe allergies and just plain enjoyed life.  My girls are getting older.  Remember this one?  My sweet first born who was eight years old the last time I posted is now turning twelve and entering junior high.  We have transitioned from a house with little, little girls to a tweenager home. It has been really fun.  I don't mean that in an "I have moody, obnoxious children" way.  I mean it in a "This is the SWEET spot of life.  I have real, deep conversations with my girls who are smart, fun, sweet with just a tiny bit of sass" way.

In regards to this style, the television has been on consistently lately.  We love watching the Olympics.  My little ones especially LOVED watching women's gymnastics and watching Gabby soar to the gold but felt so bad for her because the press went on and on about her hair.  Really?  Around here... maybe it's just Utah...all of the tween/teenage girls are wearing their hair in high ponytails pulled into a messy bun or left down but up high and full.  My own tweenager is no exception.

I rarely do her hair anymore.  She is in full independent mode.  Today she let me have at her, and you know what?  It is hard for me to do her hair!  I am out of practice with it's texture and how it moves.  But she humored me and let me have at it anyways.


6 Ağustos 2012 Pazartesi

The Piece-Y Pony

Need something to spice up your regular pony? Well here it is. The Beauty Dep. gave this is a perfect way to style it quickly & sitll looking amazing. Well, unfortunately, I went to my hair stylist a few weeks ago... Looks like my hair was a little bit more damaged than it thought it'll be. So, I finished with a shoulder lenght hair. Oh my, I'm still not used to it, but it seems that it fits me well. And it's better for a change, sometimes is good to jump out from your comfort zone.

Tools: curling iron, clear ponytail holder or a one that matches your haie color, some bobby pins, comb, hairspray.

Start by adding some curl to your hair from more texture. Tie a low ponytail. They made a line from the ear and used the hair on bottom for this. Then divide the top into 3 even sections. After that tease the middle section fir added volume and textures. Twist the middle secion and pin it into the low pony using bobby pins. Tease the side section for more texture. After that twist it back and pin it to the low pony using bobby pins. Repeat the teasing on the other side and, aswell, pin it to the ponytail. Pull a few pieces out aroud your face to soften the look. At the end, put some medium hold hairspray. 

3 Ağustos 2012 Cuma

Braidmaid Hairstyle

Hey everyone! Oh, it's been almost four days since the last post, and I'm sorry fort that. I've been a little lazy pants last few days. But here I am and I have loads of great hair tutorials in my booksmarks to show you. Here's one of them - the braidmaid hairstyle. It's called like that because it looks like a milk maid. These kinds of "braidmaids" became very popular because they can be combined with almost everything and have a little elegance in it. This hair tutorial is from Treasures and Travels. The blog belongs to a few girls that are glad to share their life and dedicate their blog to the little things in life. Just amazing!

Okay, the steps are very easy. First start braiding a classic french braid on the sides of your head. Pin the ends righ underneath the other against the head. Done! 

30 Temmuz 2012 Pazartesi

Tie n' Style a Hair Warp

There are so many ways of tiying you hair warp. In this tutorial, make sure that the hair warp has a wire in inside. That will help you style it and it'll hold your hair better. For the original post and a DIY tutorial for this hair warp go to Kelly Hicks. The tutorial is easy and won't take a lot of time. Have fun with stylin' your chic handmade headbands.


27 Temmuz 2012 Cuma

Stylish Side Ponytail

Now that it's hot everyday we all need a simple stylish hairstyle that we can make without using heat. This is a very quick hair tutorial that I've personally made. Actually the first one I made. My sister Anya has been very helpful and agreed to be my model for this post. We hope you'll like it and be surprised how such a wonderful pony can be made in less that 4 min.

Preparation: tease the back hair on the top of you head. For more volume read the prev. post, or just use a dry shampoo. After you put on the shampoo leave it like that for a few minutes, or you'll be left wit a powdery mess.

Start by moving your hair to the side that has more hair. Tie it into a low ponytail. Note: if your hair has layers, use a few bobby pins to pin the fallen out parts. Pull the elastic down, just enough to make a hole (see picture 4.). Take the rest of your hair and put it in the hole. After that just tight it and style as you want. Pretty simple, ha?  

25 Temmuz 2012 Çarşamba

Voluminous Braided Up-do

How to get volume to your hair? That's something that I always ask myself because my hair is stick straight and pretty heavy, so curls can't last long. To get more volume the hair must be airy and you must start making volume from the moment you finished washing your hair. I have a tutorial for that - Blow Dry Basics. So after you've done that, head back here and start this amazing braid crown updo. The source of this tutorial is from  Keiko Lynn, so for more info on how to make this hairstyle go there.


If your hair needs more texture, you can use a dry shampoo. This will  make the teasing past a lot easier.
Spray at your roots, lifting as you go. Wait a minute or two and comb it through of else you'll be left with a powdery mess. Then divide your hair into two sections, like you're doing a half updo. back comb underneath the top half and smooth over the top.

Pin the newly teased section (make sure the top layer is smooth, to cover the mess) with a couple bobby pins. You can give the bump a little boost if you want.

Divide your hair into two sections and braid them. You can tie them using a elastic, or leave them loose.
Pull each braid to the opposite side of you head and pin them in place. You can tuck the ends underneath each braid. And that's it! Have fun!  


24 Temmuz 2012 Salı

New In: Spring Sweater & DIY Shorts

Hey everyone! I just came back from the town, well more shopping. I was so excited to show you my new soft & a little lacy spring grey sweater. I have loved these kinds of sweaters since I knew for myself. They are very useful. If, let's say spring isn't very warm like expected, or when those summer nights get a little chilly.

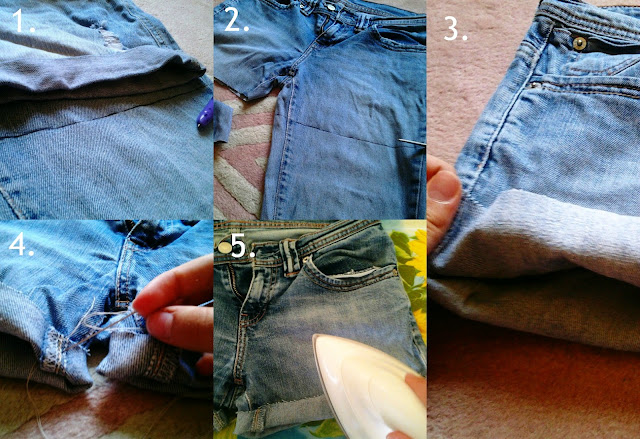
A few days ago, I used some old jeans to make this cool shorts that you see. It took me less than 5 min to make it . And I know that mostly all of you know the simple steps for turning some old jeans into a shorts, but still, if I already photographed it, why not post it?


As you can see, It's really fluffy & soft. And the dark grey color looks great. It can be worn with a tank underneath, just because it has those little dimples all over it. But it's also very warm, and made of wool. It's just a casual look that i love. 

And here's the simple quick DIY project. Using a pen, mark the length of your new shorts. Note: mark it to be a little longer that you want just so you could fold the ends. Cut the jeans by following the line. After that fold the ends - see picture 3. Sew it on the sides so it won't fold back. To secure everything, iron the ends, from the front side and back side. Well that's it, have you made any DIY shorts recently?